The AVR TWI (I²C) Interface
Overview
Some AVRs, such as the mega8, have a built-in hardware I²C interface (Atmel calls it TWI, "Two-Wire Interface"). The TWI is a two-wire synchronous serial bus which can be used to connect up to 127 slaves to one or more masters. Devices can also be slave AND master if wanted. For now, we'll only talk about single masters. This is the setup that is usually used: The AVR controls the slaves and is the only device doing so.
A typical bus transfer consists of a Start condtion, a slave address plus read/write bit, one or more bytes of data (direnction depending on the R/W bit) and a Stop condition. The TWI hardware takes care of all bus activities, such as generating Start and Stop, clock generation and data transfer. Before digging into the actual data transfer, we'll have to explain some things regarding "Which device is what, what is it doing and why does it bother me"-problems.
Every bus action that is performed by the TWI returns a status byte in TWSR (TWI Status Register). These status codes can be used to determine if something went wrong (or not). A common pitfall when writing TWI apps is checking for the *right* status code. It can happen that an application spits out an error message because it checked for the wrong status code. Which status codes are returned by the TWI hardware depends on wether the AVR is master or slave and also wether it was the transmitting or the receiving device. The status codes are divided into four groups: Master Transmitter Mode (MT), Master Receiver Mode (MR), Slave Transmitter Mode (ST) and Slave Receiver Mode (SR).
Example: Reading a data byte from page 0, address 0 from an external 24C16 (2 kBytes) EEPROM (slave address 0xA0 for writing, 0xA1 for reading):
Master generates Start (MT), status code 0x08 is returned
Master sends slave address (0xA0, MT), EEPROM returns ACK, status code 0x18
Master sends 0x00 (MT), EEPROM returns ACK, status code 0x28
Master generates repeated start (MT)
Master sends slave address (0xA1, MR), EEPROM returns ACK, status code 0x40
Master reads data (MR) from EEPROM, and returns NACK, status code 0x58
Master generates Stop (MT), no status code returned
The problem with this is the following: Though the Master transmits the slave address (see line five), it is doing that in Master Receiver Mode, because the read bit is set. This important, because the status codes returned in Master Receiver mode are not in the same table as those in Master Transmitter mode in the datasheet! Both tables should be printed out to have them ready for programming, as all TWI operations should be initiated only if the status codes were those that had been expected.
One more thing though: The short TWI action list above mentions ACK and NACK. These are transmitted as a 9th data bit and indicate whether the device receiving data accepted the data transfer or address. More on that in the Addressing and Data Transfer parts of this page.
All devices connected to the bus must be capable of driving the bus lines SCL (clock) and SDA (data). That's why the bus is externally pulled up by resistors. The devices connected to the bus only pull it low. The following figure (Figure 68 from the mega8 datasheet) shows how devices are connected to the bus:
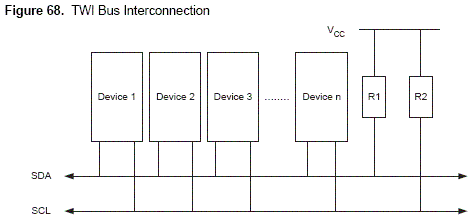
...pretty simple actually. In fact, this is just about everything you'll need for a start. If you're missing the master in the figure, remember that all devices can be the master if programmed to. Usually there will be just one master (your AVR), which might be device 2 or 6 or 120 or n. It doesn't matter. The value of the Pull-Up resistors depends on your bus capacitance (HAHA I know) and can be calculated with a formular in the datasheet (TWI Characteristics). 4K7 works.
When idle, the bus lines are high (pulled high by the resistors). When SCL is high, SDA must not change except for Start and Stop. Data on SDA can change while SCL is low and must be valid when SCL goes high. SCL is pulsed high to clock in the data. SCL is ALWAYS controlled by the master. Both master and slaves can control SDA.
Befora any address or data transmission takes place, the master generates a Start condition. This is done by taking SDA low while SCL remains high. After a transmission is complete, the master has to generate a stop condition. This is done by taking SDA high while SCL is high. Again, a figure from the datasheet:
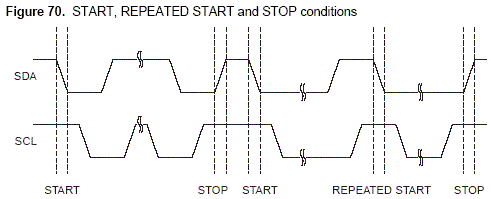
Oh, the repeated start... In multi-master systems it can happen that when a master generates a stop condition, another master will take control over the bus, though the first master actually wanted to transfer some more data to a different device than before (more on this is in the datasheert). This doesn't happen if a repeated start is generated. It works just like a normal start, but the current master remains master.
After a start condition has been generated by the master, it has to send the address of the slaves it wants to address. The slave address byte consists of a 7-bit slave address plus a transfer direction bit (R/W; 0 for writing, 1 for reading). Again, from the datasheet:
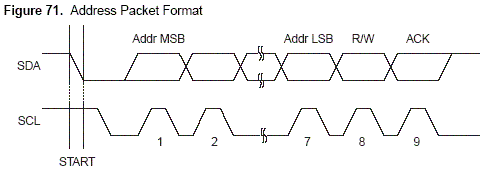
The main part of the slave address is in the high nibble (bits 4..7). A 24C16 EEPROM for example has the slave address 0xA0/0xA1 (for write and read, respectively) and uses the lower three bits (1..3) for page addressing. The lowermost bit (bit 0) is the R/W bit as explained.
If a slave recognizes its own address, it will pull SDA low in the 9th SCL cycle. This is called an ACK (acknowledge pulse), and is also used for verifying data transfers. If no slave (with the right address) is present (or if the slave doesn't want to ACK or if it's busy), SDA will stay high during the 9th SCL cycle (Pull-Up!). That would be a NACK (Not ACK).
A special case of slave addressing is the "General Call". A general call is done by addressing slave 0x00 (write). It can be used for all sorts of stuff depending on the slaves.
Data transfers work just like address transfers, but they can be done in both directions (address transfers always go from the master to the slave). They are as well terminated by an ACK/NACK. The ACK or NACK is generated by the receiving device. This can be the master or the slave, depending on the transfer direction (depends on the previous address + R/W transfer!). Multiple data transfers can be done after transmitting the slave address (for EEPROM page writes, or for reading multiple slave status registers for example). When a master reads data from a slave, it has to generate ACKs after every byte received and a NACK after the last byte. The data transfer(s) is/are followed by a Stop condition or a repeated start. A figure shouldn't be necessary here (similar to the address transfer).
It's time to show some example code! First, some important notes:
- The TWI operates based on the TWINT (TWI Interrupt) Flag in TWCR. This flag is set when an operation has been finished by the TWI hardware. While it is set, no new operation can be started. It is cleared by being written to 1. As every TWI operation is started by setting appropriate flags in TWCR, TWINT has to be written as well for EVERY operation.
- The TWI Enable bit (TWEN) is also located in TWCR and also has to be written to one for starting an operation.
Here's a TWCR description:
| Bit 7 | Bit 6 | Bit 5 | Bit 4 | Bit 3 | Bit 2 | Bit 1 | Bit 0 |
|---|---|---|---|---|---|---|---|
|
TWINT
|
TWEA
|
TWSTA
|
TWSTO
|
TWWC
|
TWEN
|
---
|
TWIE
|
Bit 7 - TWINT: As described above; This is the TWI Interrupt Flag. It is set when the TWI finishes ANY bus operation and has to cleared (by writing a 1 to it) before a new operation can be started.
Bit 6 - TWEA: TWI Enable Acknowledge; When the device receives data (as slave or as master), this bit has to be set if the next incoming byte should be ACKed and cleared for a NACK.
Bit 5 - TWSTA: TWI Start; When a master has to generate a start condition, write this bit 1 together with TWEN and TWINT. The TWI hardware will generate a start condition and return the appropriate status code.
Bit 4 - TWSTO: TWI Stop; Similar to TWSTA, but generates a Stop condition on the bus. TWINT is not set after generating a Stop condition.
Bit 3 - TWWC: TWI Write Collision; Set by the TWI hardware when writing to the TWI Data Register TWDR while TWINT is high.
Bit 2 - TWEN: Any bus operation only takes place when TWEN is written to 1 when accessing TWCR.
Bit 0 - TWIE: TWI Interrupt Enable; If this bit is set, the CPU will jump to the TWI reset vector when a TWI interrupt occurs.
As all TWI operations are determined by the value written to TWCR, they're all similar. Here's the usual structure: