INSTRUCTIONS FOR BUILDING THE LPF, A component of the multiPIG+
The LPF kit includes 4 plastic envelopes, 28' of wire and a set of instructions.
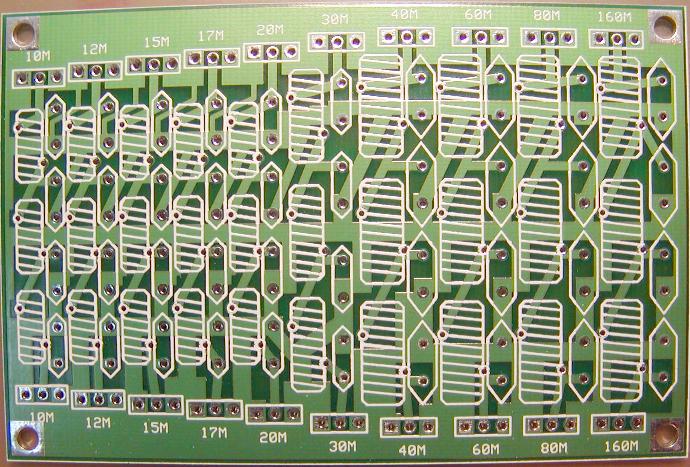
1. PCB
2. Toroids
3. Capacitors
4. Headers, Pins and Housings
5. 28 Feet 27 GA magnet wire
6. This Document
We will build the LPF in this order:
1. Wind the 10 meter toroids
2. Install 10 meter toroids
3. Install 10 meter capacitors
4. Install 10 meter headers
5. Repeat in same order for 12 meters
6. Repeat in same order for remaining bands
Ready...set...begin!
Reference this schematic:
 Reference this parts list:
BAND L1/L3 Coverage length L2 Coverage Wire length C1 & C4 C2 & C3
---- ------------------------ ------------------------ ------- -------
160M 20T T50-1 80% 4.44uH 15" 23T-T50-1-85% 5.61uH 17" 820pF 2200pF
80M 21T T44-2 85% 2.43uH 14" 23T-T44-2-85% 3.01uH 15" 470pF 1200pF
60M 19T T44-2 85% 1.97uH 13" 21T-T44-2-85% 2.29uH 14" 470pF 1000pF
40M 17T T44-6 80% 1.38uH 12" 19T-T44-6-80% 1.70uH 13" 270pF 680pF
30M 15T T44-6 80% 1.09uH 11" 16T-T44-6-80% 1.26uH 11" 270pF 560pF
20M 15T T37-6 85% 0.77uH 10" 16T-T37-6-80% 0.90uH 10" 180pF 390pF
17M 13T T37-6 80% 0.55uH 9" 14T-T37-6-85% 0.67uH 9" 110pF 270pF
15M 11T T37-6 80% 0.44uH 8" 13T-T37-6-80% 0.56uH 9" 82pF 220pF
12M 11T T37-6 80% 0.44uH 8" 12T-T37-6-70% 0.52uH 8" 100pF 220pF
10M 9T T37-6 65% 0.30uH 7" 10T-T37-6-60% 0.38uH 7" 56pF 150pF
____Remove the PCB from it's plastic bag.
____Cut 7 inches of wire EXACTLY from the 3-inch diameter magnet wire roll.
____Wind L2 - Hold a T37-6 yellow toroid with your right hand between your thumb and your
index finger, Using your left hand, grab the 7 inch wire and insert the wire through
the toroid hole from the top. Wrap the end of the wire around the toroid to your left.
Loop the end through the toroid to your left until 10 turns are through the core.
Space the windings so that the 10 turns occupy about 2/3 of the toroid or 60 pct.
You should also have about one inch free wire on both legs of the toroid.
____Using a 700 Def F solder pencil, heat the toroid leads, applying solder at rthe
same time. This will melt the insulation and tin the wire. Tin the wires all the way
to the body of the toroid.
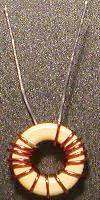
WIND ALL TOROIDS TIGHT!!!!!!!!!!!
The toroid should look like the picture, except only 10 turns and only 60 pct coverage.
The picture shown is about 80 pct coverage.
Reference this parts list:
BAND L1/L3 Coverage length L2 Coverage Wire length C1 & C4 C2 & C3
---- ------------------------ ------------------------ ------- -------
160M 20T T50-1 80% 4.44uH 15" 23T-T50-1-85% 5.61uH 17" 820pF 2200pF
80M 21T T44-2 85% 2.43uH 14" 23T-T44-2-85% 3.01uH 15" 470pF 1200pF
60M 19T T44-2 85% 1.97uH 13" 21T-T44-2-85% 2.29uH 14" 470pF 1000pF
40M 17T T44-6 80% 1.38uH 12" 19T-T44-6-80% 1.70uH 13" 270pF 680pF
30M 15T T44-6 80% 1.09uH 11" 16T-T44-6-80% 1.26uH 11" 270pF 560pF
20M 15T T37-6 85% 0.77uH 10" 16T-T37-6-80% 0.90uH 10" 180pF 390pF
17M 13T T37-6 80% 0.55uH 9" 14T-T37-6-85% 0.67uH 9" 110pF 270pF
15M 11T T37-6 80% 0.44uH 8" 13T-T37-6-80% 0.56uH 9" 82pF 220pF
12M 11T T37-6 80% 0.44uH 8" 12T-T37-6-70% 0.52uH 8" 100pF 220pF
10M 9T T37-6 65% 0.30uH 7" 10T-T37-6-60% 0.38uH 7" 56pF 150pF
____Remove the PCB from it's plastic bag.
____Cut 7 inches of wire EXACTLY from the 3-inch diameter magnet wire roll.
____Wind L2 - Hold a T37-6 yellow toroid with your right hand between your thumb and your
index finger, Using your left hand, grab the 7 inch wire and insert the wire through
the toroid hole from the top. Wrap the end of the wire around the toroid to your left.
Loop the end through the toroid to your left until 10 turns are through the core.
Space the windings so that the 10 turns occupy about 2/3 of the toroid or 60 pct.
You should also have about one inch free wire on both legs of the toroid.
____Using a 700 Def F solder pencil, heat the toroid leads, applying solder at rthe
same time. This will melt the insulation and tin the wire. Tin the wires all the way
to the body of the toroid.
WIND ALL TOROIDS TIGHT!!!!!!!!!!!
The toroid should look like the picture, except only 10 turns and only 60 pct coverage.
The picture shown is about 80 pct coverage.
 NOTE: All reference/part location descriptions for the PCB are with the writing on top and
the 10 meter section on the left edge of the PCB
NOTE: All reference/part location descriptions for the PCB are with the writing on top and
the 10 meter section on the left edge of the PCB
 ____Insert L2 from the top, into the center toroid spot in the 10 meter section of the PCB.
Pull the toroid leads through the PCB tight and solder on the bottom of the PCB.
Clip excess leads. The toroid should stand up like the picture shows.
____Insert L2 from the top, into the center toroid spot in the 10 meter section of the PCB.
Pull the toroid leads through the PCB tight and solder on the bottom of the PCB.
Clip excess leads. The toroid should stand up like the picture shows.
 ____Cut TWO 7 inches of wire EXACTLY from the 3-inch diameter magnet wire roll.
____Make TWO toroids L1 & L3 like L2, but wind only 9 turns through the core.
Space the windings so that the 9 turns occupy about 2/3 of the toroid or 65 pct.
____Install L1 into the bottom toroid position in the 10 meter section
____Install L3 into the top toroid position in the 10 meter section
____C1 - Insert a 56pF cap from the top of the PCB into the lowest cap position
in the 10 meter section. This cap is located just above the lower 10 meter header.
Slder and clip excess leads.
____C4 - Insert another 56 pF cap and install in the top of the PCB, just below the
upper 10 meter header. Solder and clip.
____C2 & C3 - Insert a 150 pF cap into each of the remaining two cap locations
in the 10 meter section of the PCB.
____Install the two 10 meter headers on the top of the PCB. The short end of
the header goes through the PCB. solder on the bottom of the PCB
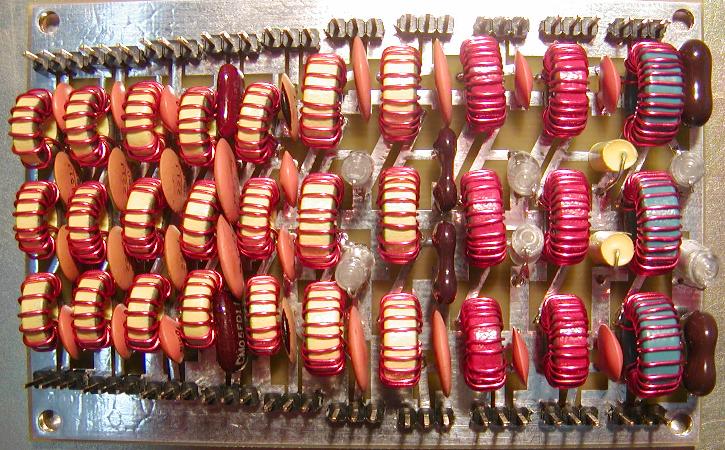
This completes the 10 meter section of the LPF.
Install the remailing 9 bands in the same order as the 10 meter band.
The 10, 12, 15, 17 and 20 meter filters use T37-6 small yellow toroids.
The 30 and 40 meter bands use T44-6 larger yellow toroids.
The 60 and 80 meter bands use the T44-2 red toroids.
160 meter band uses the T50-1 blue toroids.
WHEN WINDING ALL TOROIDS, OBSERVE THE PERCENT COVERAGE NUMBER.
ALSO CUT THE LENGTHS EXACTLY AS SPECIFIED.
____Install components for the 12 meter band
____Install components for the 15 meter band
____Install components for the 17 meter band
____Install components for the 20 meter band
____Install components for the 30 meter band
____Install components for the 40 meter band
____Install components for the 60 meter band
____Install components for the 80 meter band
____Install components for the 160 meter band
Need Help?
Email me ... w8diz at fpqrp.com
____Cut TWO 7 inches of wire EXACTLY from the 3-inch diameter magnet wire roll.
____Make TWO toroids L1 & L3 like L2, but wind only 9 turns through the core.
Space the windings so that the 9 turns occupy about 2/3 of the toroid or 65 pct.
____Install L1 into the bottom toroid position in the 10 meter section
____Install L3 into the top toroid position in the 10 meter section
____C1 - Insert a 56pF cap from the top of the PCB into the lowest cap position
in the 10 meter section. This cap is located just above the lower 10 meter header.
Slder and clip excess leads.
____C4 - Insert another 56 pF cap and install in the top of the PCB, just below the
upper 10 meter header. Solder and clip.
____C2 & C3 - Insert a 150 pF cap into each of the remaining two cap locations
in the 10 meter section of the PCB.
____Install the two 10 meter headers on the top of the PCB. The short end of
the header goes through the PCB. solder on the bottom of the PCB
This completes the 10 meter section of the LPF.
Install the remailing 9 bands in the same order as the 10 meter band.
The 10, 12, 15, 17 and 20 meter filters use T37-6 small yellow toroids.
The 30 and 40 meter bands use T44-6 larger yellow toroids.
The 60 and 80 meter bands use the T44-2 red toroids.
160 meter band uses the T50-1 blue toroids.
WHEN WINDING ALL TOROIDS, OBSERVE THE PERCENT COVERAGE NUMBER.
ALSO CUT THE LENGTHS EXACTLY AS SPECIFIED.
____Install components for the 12 meter band
____Install components for the 15 meter band
____Install components for the 17 meter band
____Install components for the 20 meter band
____Install components for the 30 meter band
____Install components for the 40 meter band
____Install components for the 60 meter band
____Install components for the 80 meter band
____Install components for the 160 meter band
Need Help?
Email me ... w8diz at fpqrp.com